SAFE WORK WITH ABRASIVE TOOLS
Preparatory and assembly actions before the actual work with grinding wheels Safety elements associated with the use of abrasive tools
Preparation, installation and commissioning of the abrasive tool on the machine should be carried out in accordance with the workstation instructions, taking into account the recommendations and requirements of: the manufacturer of the grinding machine, the manufacturer of the abrasive tool, technological instructions for grinding operations.
Preparatory and mounting works should be carried out by a qualified, trained person or a worker under the supervision of an authorized person. Special attention should be paid to the operating speed of grinding wheels.
I. Preparation works before using abrasive tools
Before mounting the wheel on the machine spindle, it is necessary to:
Check the condition of the grinding wheel:
- Inspect its external appearance for mechanical damages, cracks, breakage, chipping. Such an assessment is to be carried out under the good lighting
- Perform a sound test. See description on general rules of transportation and storage
- Check the marking of the grinding wheel and especially compare the permissible speed indicated on the wheel, with the speed of the grinding machine spindle.
Check the condition of the grinder and the components directly interacting with the grinding wheel, in accordance with the applicable instructions, in particular:
- Check the actual spindle speed, especially for variable speed grinders and after any repair of the grinder.
- Evaluate the condition of the grinding wheel positioning surfaces and the clamping faces of the flanges, which:
- should have the appropriate dimensions according to regulations
- should be flat, clean, without damage and should slide without any jamming
- should be perpendicular to the base surfaces
- clamping flanges should be selected in pairs and have: the same outside diameters, the same recesses and shapes so that they clamp the grinding wheels only with ring-shaped surfaces, equally on both sides. This prevents the grinding wheel from being clamped by the edge of the bore, which is susceptible to chipping and cracking
- clamping flanges must be balanced.
- Clamping system (adaptor) of the grinding wheel transfers a drive; make sure it is properly located and fixed on the spindle.
- Make sure that the grinding wheel fits freely on the spindle or adaptor. To ensure this, a sliding fit between the spindle and the grinding wheel bore must be maintained: the bore diameter with positive dimensional tolerance, while the spindles diameter with negative tolerance.
- Clamping nuts and grinding wheel mounting screws.
- The nut on the spindle must be properly tightened, although not too much, so that enable proper drive of the grinding wheel, without slips. If the flange has many screws, located on a circle, they must be tightened evenly and at the same time screws opposite each other. Check the grinding wheel mounting bolts and nuts to see if they can be tightened without any jams or resistance.
- Check blotters.
Blotters
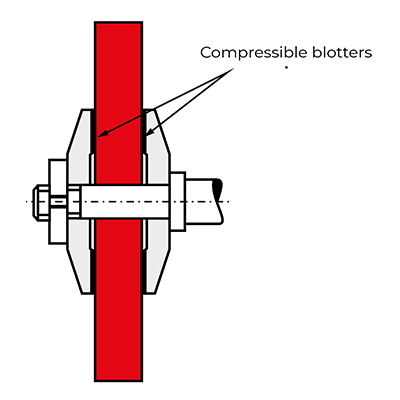
The blotters are made of flexible and compressible material, such as cardboard, plastic and are placed between the flange and the grinding wheel (see figure). The blotters should be between 0.36 and 0.5 mm thick, and their diameter should be at least equal to the diameter of the flanges. The purpose of the blotters is to:
- take up any distortion between the flange and the wheel, within the area of flange pressure
- reduce the risk of slippage between the wheel and the flanges
- rdistribute, equally, the axial clamping force when the nut is tightened, over the entire contact area between the flanges and grinding wheels.
In general, two blotters, of the same size are laid or glued on both sides of the grinding wheel. Blotters are supplied by the manufacturer or at the request of the customer.
Blotters are not necessary in the following cases:
- small grinding wheels D ≤ 20 mm
- on type 27 depressed center grinding wheels
- on type 29 semi-flexible wheels
- on flat and depressed center cutting-off wheels, type 41 and 42, D ≤ 230 mm
- on steel centred cutting-off wheels, type 43
- on type 4 wheels with tapered flanges
- on straight and flared cup wheels type 6 and 11, with the central nut
- on cemented disk or threaded insert disc wheels types 35 and 36
- on cemented cylinder and threaded insert cylinder wheels types 2 and 37
- on type 31 segments
- on type 52 mounted wheels and points
- on plugs and cones with central threaded inserts, types 16 and 19
- honing stone type 54 and hand stone type 90
- on extra thin laminated wheels T ≤ 0.5 mm, used for slitting and cutting-off
Clamping nuts and screws

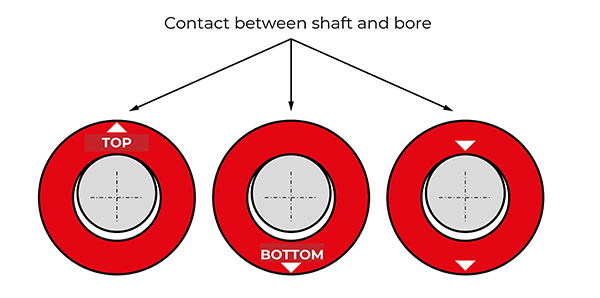
Blotter may also be an identification label

Example of marks indicating the position of a grinding wheel

II. Mounting the grinding wheel on the spindle
Only grinding wheels which have the maximum permissible speed equal or higher than the actual speed of spindle may be mounted on the spindle. The maximum permissible speed marked on the wheel may not be exceeded under no circumstances.
When mounting the grinding wheel on the spindle, pay attention to the following points:
- when tightening the flanges with screws, proceed from one screw to one diametrically opposite and then in crisscross sequence (similarly to car wheels), without exerting an excessive clamping pressure.
- it is recommended to use a torque wrench. The approximate amount of torque for tightening screws, is given in the table.
Static/dynamic balancing
On grinding stations equipped with static or dynamic balancing equipment, correct the balance of the set: grinding wheel - blotters – adaptor.
It is necessary to carefully mount the set of grinding wheel with adapter on the grinding machine spindle. Tighten screws and nuts. After mounting the grinding wheel on the spindle, it is necessary to:
- remove all unnecessary objects and tools from the grinder
- close and fasten guards, adjust the position of supports and chucks
- rotate the grinding wheel by hand to check whether it rotates freely
- make sure there is no runout.
Wielkość momentu obrotowego dociągania śrub mocujących
|
Gwint śruby/p> |
Wysokość ściernicy w mm* |
|
|
<30 |
≥30 |
|
|
Zalecany moment obrotowy w [N m] |
||
|
M10 M12 M16 M20 |
30 40 60 80 |
40 60 80 100 |
*) Dla zespołu ściernic moment dociągania należy przyjąć jak dla ściernicy o wysokości równej sumie wysokości.
III. Start-up of the grinding wheel - test work
All grinding wheels with an outside diameter of more than 100 mm should be subjected to a trial test by idle running before they are used for the first time, as well as after each new installation. This test should be carried out in the presence of a person authorized for grinding wheel mounting.
The time of the trial test should be:
- for portable grinders -1/2 minutes
- for all other grinders - 1 minute.
The test can be carried out only when the hazardous area is protected and the guard is installed in the proper position. The grinding wheel may be used only after trial test is passed. After the test, you can dress the grinding wheel, check and correct the balance, and proceed to work.
Additional information
Personal protection
During grinding operations, the abrasive tool user (grinder) may be exposed to falling debris or excessive noise. In order to protect the grinder, it is necessary to use protective equipment such as safety glasses, ear protectors, gloves or a leather apron.
Declaration of safety
The abrasive tools we supply are not hazardous for health in the range of civil low ordinances and regulations. They are free of antimony, lead, cadmium, asbestos, free phenol and free formaldehyde. They are not subject to the mandatory marking required by regulations for harmful materials.
Waste disposal
Abrasive tool waste is the property of the waste producer, i.e. the abrasive tool user, who is obliged to handle the waste in a manner consistent with the waste management rules set forth in the Waste Law and related regulations.
Final remarks
Hand-held grinders should be used in a way that prevents the grinding wheel from jamming in the material. In case of hand-held cutting-off machines, the wheel should be placed in the slit in the straight position. Before putting away the hand-held grinder on the workbench or on the floor, switch it off and check that it is stopped. It is strictly prohibited to throw a grinder with a grinding wheel.
Manufacturer of grinding wheels takes no responsibility for any personal injuries nor machine damages or other material losses resulting from failure in observance of the a.m. safety rules during grinding operations with abrasive tools.
Since the beginning of its activity, ANDRE company has been focusing on high quality of its products. At ANDRE, every effort is made to ensure that products meet customers' individual needs and satisfy their highest expectations even in the most difficult grinding operations.
Abrasive tools by ANDRE ABRASIVE ARTICLES are safe.
ANDRE gradually improves its technological process to offer abrasive tools with increasingly better usability and a high safety factor in accordance with the applicable standards. Membership in organizations of leading abrasive tool manufacturers and regular certification fully confirm that.


